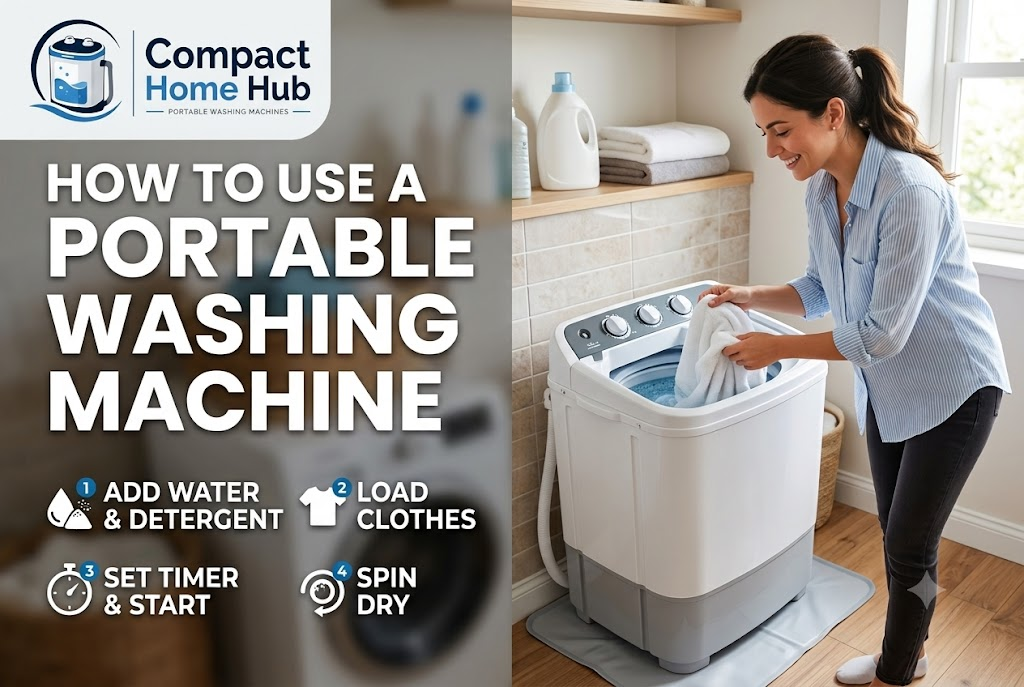
Featured Image Suggestion
Image concept: A realistic Indian apartment laundry setup showing a compact portable washing machine beside a kitchen or bathroom sink. Show the water inlet hose connected to a faucet, the drain hose positioned securely in a sink or drain area, a small basket of clothes nearby, and simple visual labels for Water In → Wash → Drain → Rinse → Spin.
A portable washing machine can solve a very specific problem: you want to wash clothes at home, but you don’t have the space, plumbing, or need for a full-size washing machine.
That sounds straightforward until you actually use one.
Where does the water go?
How much detergent should you add?
Should you fill the tub before putting clothes in?
Does the machine drain automatically?
What happens after the wash cycle?
And, with a twin-tub model, when exactly do you move the clothes to the spin tub?
Some portable washers operate much like compact automatic top-load machines. Others require you to manage separate wash, drain, rinse, and spin stages. Manufacturer instructions also differ in areas such as faucet connections, drain arrangements, load limits, and cycle controls.
Learn the basic operating sequence, then adapt it to the instructions supplied with your particular machine.
This guide explains that process in practical terms for Indian households, including apartments, rented homes, small bathrooms, utility areas, and homes where the washer needs to be connected to a sink or faucet only when required.
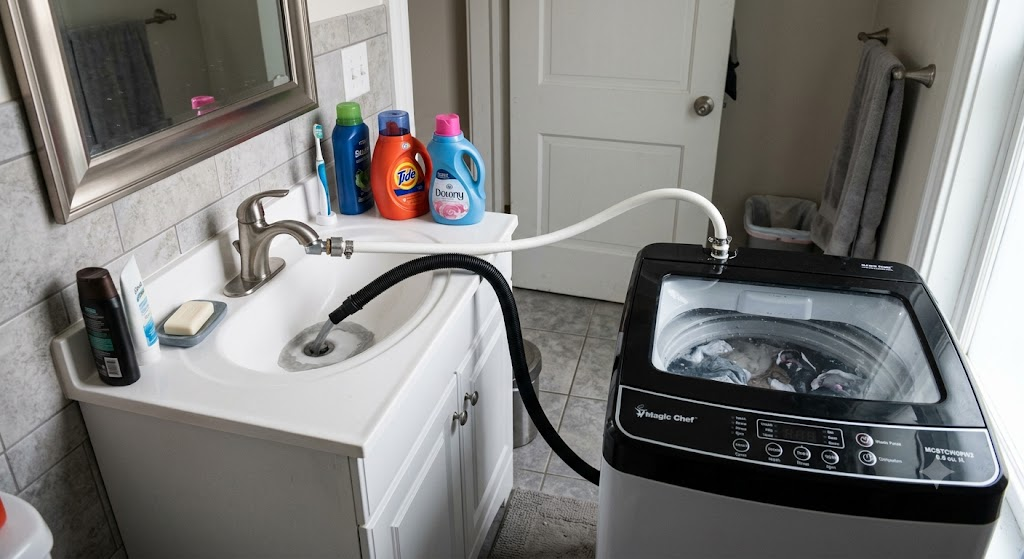
How to Use a Portable Washing Machine in 30 Seconds
If you are using a portable washer for the first time, follow this basic sequence:
- Place the washer on a stable, level surface.
- Position it close enough to the water source and drain.
- Connect the inlet hose according to the manufacturer’s instructions.
- Secure the drain hose before adding water.
- Separate clothes by colour, fabric type, and washing instructions.
- Load the washer without exceeding its rated capacity.
- Add detergent according to the detergent and washer instructions.
- Choose the appropriate wash cycle or wash time.
- Start the wash cycle.
- Drain the dirty water.
- Run the rinse stage or refill with clean water, depending on the machine.
- Use the spin cycle if your model has one.
- Remove the clothes promptly and leave the washer open to dry.
Key Takeaways
1. There is no single operating procedure for every portable washer
A compact automatic washer and a manual twin-tub washer may look similar from a distance but can require very different operating steps. Check the owner’s manual before assuming that a particular control, hose, or cycle works the same way as another machine.
2. Setup matters as much as the wash cycle
A poorly positioned or improperly connected portable washer can vibrate, leak, drain incorrectly, or become difficult to operate. GE specifically recommends positioning its compatible portable washers within reach of the appropriate electrical outlet, leveling the machine, and checking hose connections carefully during installation.
3. Don’t overload a portable washer because the tub looks bigger than the recommended load
The rated capacity is a useful operating limit, not merely a suggestion for maximum convenience. Clothes need room to move through the wash process. Packing the tub tightly can also make balancing more difficult during spinning.
4. Detergent quantity should not be guessed
More detergent does not automatically mean cleaner clothes. Use the detergent manufacturer’s directions together with the washing machine manufacturer’s instructions. The appropriate quantity can depend on detergent concentration, load size, water conditions, and machine design.
5. Drainage is one of the most important parts of portable-washer operation
The washer needs a reliable way to discharge used water. A drain hose that is loose, kinked, poorly positioned, or incompatible with the machine can result in water remaining in the tub or leaking onto the floor.
6. Twin-tub washers require more manual involvement
If your washer has separate wash and spin tubs, you will typically need to move clothes between them. That is not a defect it is part of the design.
7. Your owner’s manual overrides generic advice
This is especially important for:
- Maximum load
- Water level
- Detergent type
- Water temperature
- Hose connections
- Drain positioning
- Spin duration
- Electrical requirements
- Cleaning procedures
- Error codes
Whirlpool similarly advises users to consult the specific installation manual because installation requirements and appliance dimensions can vary between models.
Who Should Read This Guide?
This guide is intended for anyone who has purchased—or is considering purchasing—a portable washing machine and wants to understand how to operate it properly.
It is particularly useful for:
- People using a portable washer for the first time
- Apartment residents
- Students living in rented accommodation
- People with limited laundry space
- Users without a permanent washing-machine connection
- People using a washer near a kitchen or bathroom sink
- Owners of compact or mini washing machines
- Users of twin-tub portable washers
- People who are unsure how to drain or rinse a portable washer
- Anyone experiencing basic operating problems
It can also help someone decide whether a portable washer is actually suitable for their household before buying one.
Why You Can Trust ReviewSpot
ReviewSpot’s recommendation should be based on documented information rather than assumed hands-on experience.
For this guide, the operating principles are cross-checked against manufacturer documentation and support information, including portable-washer installation guidance from GE Appliances and washing-machine installation guidance from Whirlpool.
Manufacturer documentation is particularly important for portable washing machines because there is substantial variation between models.
What Is a Portable Washing Machine?
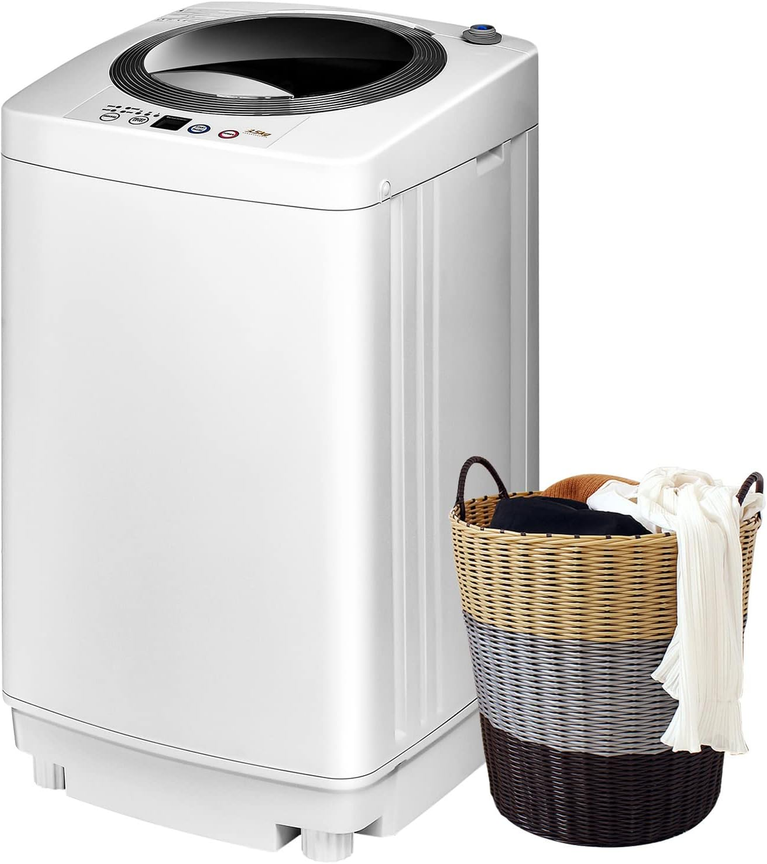
A portable washing machine is a compact clothes washer designed for situations where a conventional, permanently installed washing machine is impractical.
Unlike a typical full-size washing machine that usually stays connected to dedicated plumbing, a portable washer can often be connected to a suitable faucet or water source when you need to do laundry and disconnected afterward.
However, portable does not automatically mean completely plug-and-play.
How to Use a Portable Washing Machine
The exact controls vary by machine, but most portable washers follow the same basic laundry logic. Before starting, identify whether your machine is:
- Fully automatic
- Twin-tub/semi-automatic
- Single-tub compact
- Manual
The instructions below describe the general process. If your manufacturer’s manual specifies a different procedure, follow the manual.
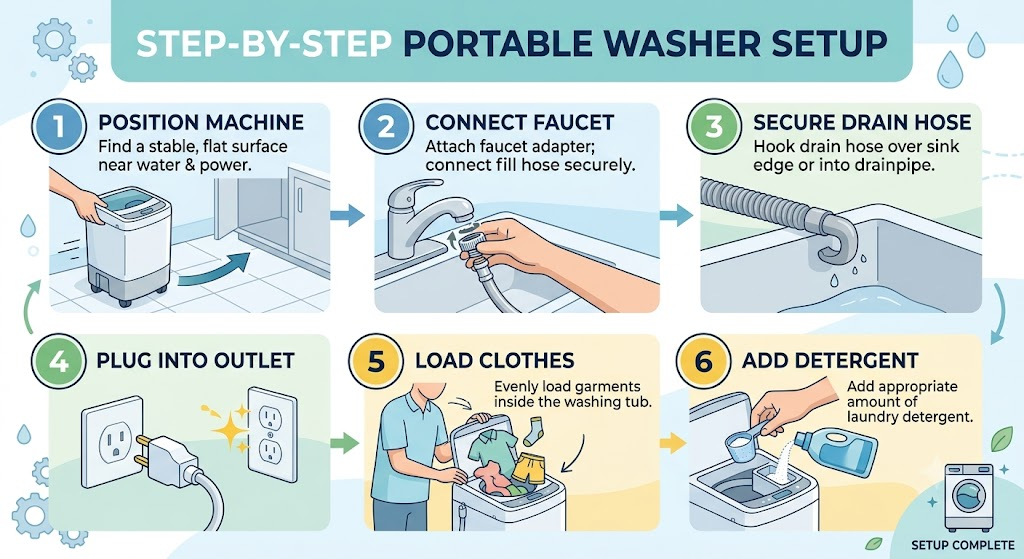
Step 1: Choose a Suitable Location
Place the portable washing machine on a stable, level surface that can safely support the machine and its water-filled load. Keep enough space around the washer for:
- Water connections
- Drain hose
- Power cord
- Lid or door movement
- Air circulation
- Safe loading and unloading
A bathroom, utility area, balcony or kitchen-adjacent space may be practical in an Indian home, but the location must be appropriate for the particular appliance.
Avoid placing the machine where:
- It can easily get splashed with water.
- The floor is unstable.
- The drain hose cannot reach a suitable drain.
- The power connection is exposed to water.
- The machine blocks a walkway.
- The lid cannot open properly.
Why leveling matters
An unbalanced machine can vibrate excessively during spinning. This is particularly noticeable with compact machines because the washer itself may be lighter than a full-size appliance.
Expert Tip: Don’t judge stability by an empty machine. A washer can feel stable before filling but behave very differently once water and wet clothes add weight.
Step 2: Check the Water Supply
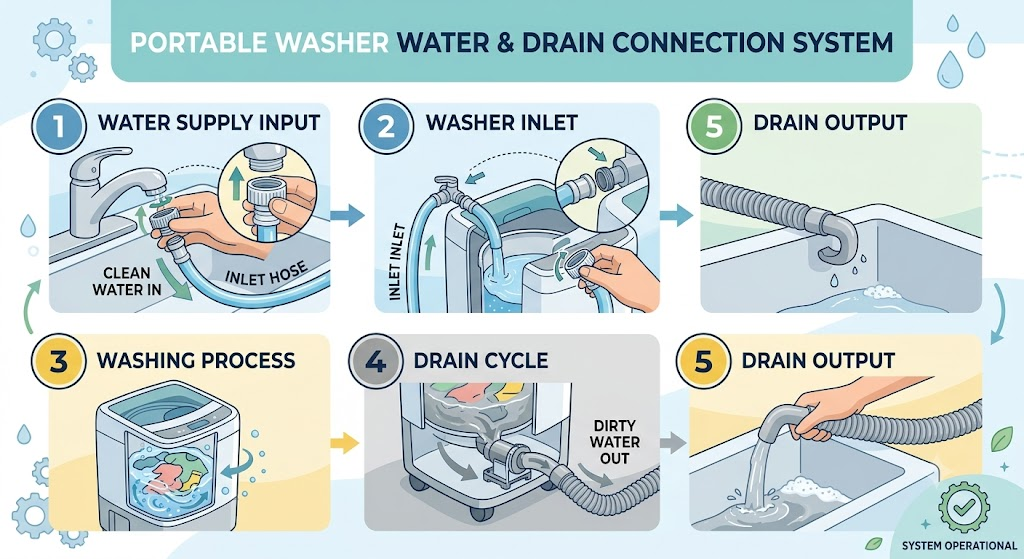
Determine how your particular portable washer receives water. Depending on the model, it may use:
- A faucet connection
- A supplied inlet hose
- A faucet adapter
- Manual filling
- Another model-specific water arrangement
Don’t force a hose or adapter onto a faucet simply because the connection looks close.
For faucet-connected models
Check:
- Whether the faucet is compatible.
- Whether the correct adapter is installed.
- Whether the inlet hose is firmly connected.
- Whether the connection leaks when water is turned on.
Some manufacturers provide specific faucet-adapter systems for their portable washers. GE, for example, describes a faucet adapter and unicouple arrangement for compatible portable models. That doesn’t mean the same connection applies to every portable washer.
Step 3: Position the Drain Hose
Before adding water, make sure the drain hose is positioned correctly. Depending on your machine, wastewater may be discharged into:
- A sink
- A bathtub
- A floor drain
- Another manufacturer-approved drain point
Secure the hose so that it cannot fall out when wastewater begins flowing.
Why do this before washing?
A forgotten drain hose can turn a normal wash cycle into a flood. This is especially important if you are using a temporary setup in a kitchen or bathroom.
Common Mistake: Putting the drain hose into the sink after the washer has already started filling. Set up the drain route first.
Step 4: Check the Electrical Connection
Follow the electrical requirements supplied with your particular washer. Before operating:
- Check the plug and cord for damage.
- Keep electrical connections away from water.
- Use the appropriate outlet specified by the manufacturer.
- Avoid improvised electrical connections.
- Do not handle plugs with wet hands.
If the manufacturer specifies grounding or other electrical requirements, follow those instructions.
Why this matters
A portable washer combines water and electricity in the same appliance. That makes correct electrical setup a safety issue, not merely a convenience issue.
Step 5: Sort Your Clothes
Don’t put every garment into the machine at once. Separate clothes according to:
- Colour
- Fabric
- Care instructions
- Soil level
- Weight
For example:
Load A
Light everyday cotton clothing.
Load B
Dark-coloured garments.
Load C
Delicate items where the care label permits machine washing.
Load D
Heavier garments such as jeans. This can improve consistency and makes it easier to select an appropriate wash program.
Practical Tip: Read the garment care label before washing unfamiliar fabrics. The washing machine cannot override a garment’s washing restrictions.
Step 6: Check Pockets and Fasten Garments
Before loading:
- Empty pockets.
- Remove loose objects.
- Close zippers where appropriate.
- Secure hooks or fasteners.
- Separate items that could damage delicate fabrics.
A small object such as a coin can become a drainage or mechanical problem if it ends up in the wrong place.
Step 7: Load the Washer Correctly
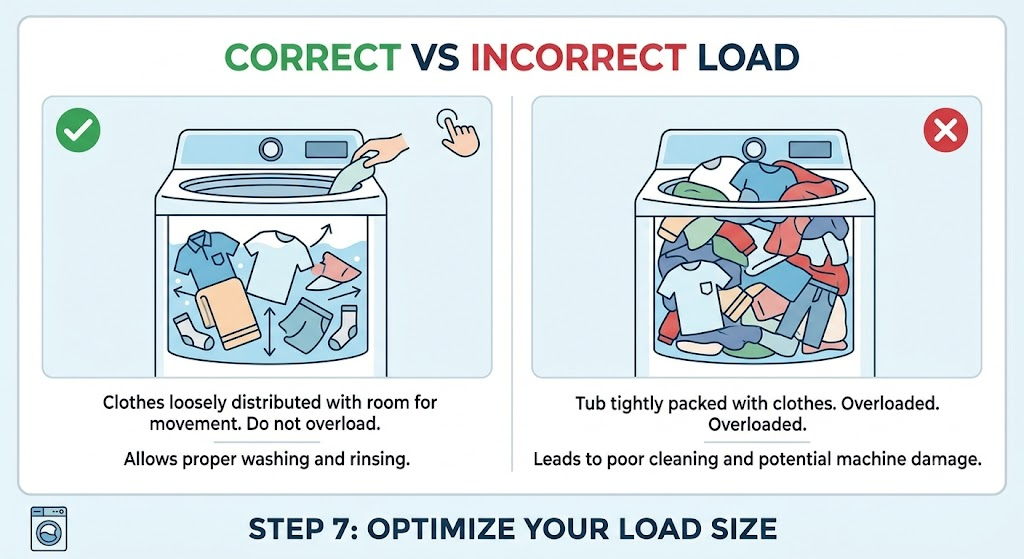
Add clothes according to the manufacturer’s load limit. Don’t pack the tub tightly simply because more clothes physically fit.
Why overloading is a problem
The clothes need enough room to move through the water and detergent. Overloading can contribute to:
- Poor cleaning
- Poor rinsing
- Uneven spinning
- Excessive vibration
- Longer drying time
Heavy versus light clothing
A load containing lightweight T-shirts behaves differently from a load containing wet towels or jeans. For compact washers, this difference can be especially noticeable.
Expert Tip: When learning a new machine, start with a smaller everyday load. Once you understand how it handles washing and spinning, increase the load gradually within the manufacturer’s limit.
Step 8: Add Detergent
Use the detergent recommended or permitted by your washer’s instructions. The correct amount depends on factors such as:
- Detergent concentration
- Load size
- Soil level
- Water conditions
- Washer design
Don’t assume more detergent means cleaner clothes
Too much detergent can increase residue and make rinsing more difficult. Too little may be inadequate for the particular load. Follow the detergent packaging and your washer’s instructions rather than copying the quantity used in another machine.
Step 9: Add Water or Connect the Water Supply
The exact procedure depends on the machine.
Automatic portable washer
You may connect the water supply and select the appropriate program.
Manual-fill machine
You may need to add water yourself to the manufacturer’s specified level.
Twin-tub machine
You may need to fill the wash tub before starting the wash stage. Never exceed the recommended water level.
Step 10: Select the Wash Program
Choose the setting appropriate for the load. Depending on the machine, controls may include:
- Wash time
- Water level
- Fabric-related programs
- Normal
- Delicate
- Quick
- Heavy
- Spin duration
Not every portable washer provides all of these options.
Choosing a cycle
For lightly soiled everyday clothes, a normal or appropriate shorter program may be sufficient. For heavily soiled clothing, the manufacturer’s recommended longer or stronger cycle may be appropriate. For delicate fabrics, follow the garment care label and the washer’s compatible settings.
Step 11: Start the Wash
Once the machine is loaded, water supply is ready, drain arrangement is secure and the appropriate setting has been selected, start the wash cycle. During the first few minutes, pay attention to the machine.
Look for:
- Water leakage
- Unusual vibration
- Unexpected movement
- Drainage problems
- Unusual sounds
If something appears abnormal, stop the machine according to the manufacturer’s procedure and investigate. Don’t simply leave a newly installed machine unattended during its first cycle.
Step 12: Drain the Dirty Water
After the wash stage, the used water must be removed. Depending on your washer, drainage may be:
- Automatic
- Pump-assisted
- Controlled by a drain selector
- Manually positioned
- Another manufacturer-specific system
If drainage is slow
Check for:
- Kinks
- Blockages
- Incorrect hose positioning
- A clogged drain
- A drain hose that is too long or incorrectly routed
- A problem with the machine’s pump, if equipped
Do not repeatedly restart the washer without finding the cause.
Step 13: Rinse the Clothes
Rinsing removes remaining detergent and suspended soil from the clothes. A fully automatic machine may manage this stage automatically. A twin-tub or manual machine may require you to:
- Drain the wash water.
- Add clean water.
- Run the rinse stage.
- Drain again.
Some machines provide separate rinse controls. Others may require a different procedure.
How many rinses are needed?
Don’t assume that more rinses are always better. Follow the machine instructions and adjust based on the load and detergent used. If you notice detergent residue, review:
- Detergent quantity
- Load size
- Water level
- Rinse procedure
before simply adding repeated rinse cycles.
Step 14: Transfer Clothes to the Spin Tub — Twin-Tub Models
This step applies specifically to machines with separate wash and spin tubs.
After washing and rinsing:
- Remove the clothes from the wash tub.
- Allow excess water to drain as appropriate.
- Place clothes evenly in the spin tub.
- Avoid creating a heavily unbalanced pile.
- Close the spin cover if the machine requires it.
- Select the recommended spin duration.
- Start the spin cycle.
Why load balance matters
An uneven load can cause strong vibration during high-speed spinning. If the machine shakes excessively:
Stop → redistribute clothes → restart according to the manual.
Don’t simply hold the machine down or allow severe vibration to continue.
Step 15: Remove Clothes Promptly
Once the cycle has finished, remove the clothes. Leaving wet clothes inside for a long time can contribute to unpleasant odours. Move them to the appropriate drying location. For Indian homes, this may be:
- Balcony
- Clothesline
- Drying rack
- Well-ventilated indoor area
- Another suitable drying space
Avoid crowding wet clothes together. Good airflow generally helps them dry more efficiently.
Step 16: Leave the Washer Ready for the Next Use
After completing the laundry:
- Follow the manufacturer’s cleaning instructions.
- Remove visible lint or debris where appropriate.
- Wipe accessible surfaces if needed.
- Allow appropriate interior areas to dry.
- Store hoses safely if the machine is disconnected after use.
If the machine remains installed, keep the area around it clean and dry.
How to Use a Twin-Tub Portable Washing Machine
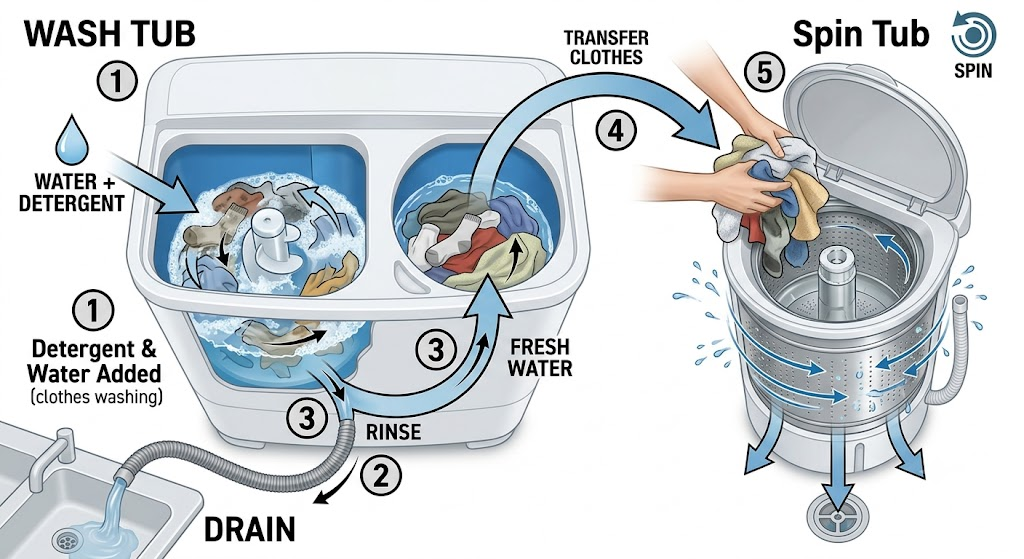
Twin-tub machines deserve separate attention because they require more manual interaction.
Typical sequence
Put clothes in the wash tub
Don’t exceed the manufacturer’s recommended capacity.
- Add detergent: Use the appropriate amount.
- Add water: Fill to the recommended level.
- Start the wash: Select the appropriate wash time or program.
- Drain: Move the drain control or hose according to the manufacturer’s instructions.
- Refill with clean water: This starts the rinse process on machines requiring manual rinsing.
- Drain the rinse water: Remove the dirty rinse water.
- Transfer clothes: Move the rinsed clothes into the spin tub.
- Balance the load: Distribute clothing evenly.
- Spin: Run the manufacturer’s recommended spin time.
- Remove and dry: Take the clothes out and start drying.
Expert Tip: If you’re new to a twin-tub washer, keep the sequence visible near the machine: Wash → Drain → Rinse → Drain → Transfer → Spin.
How to Use a Fully Automatic Portable Washer
The process is usually simpler.
Basic sequence
- Connect the water supply.
- Position the drain hose.
- Load clothes.
- Add detergent.
- Select the program.
- Start the machine.
- Allow the programmed cycle to complete.
- Remove clothes.
- Clean/dry the washer as instructed.
The machine may automatically control water filling, washing, rinsing and spinning. But don’t assume it does. Check your specific model’s cycle description.
Best Practices for Using a Portable Washing Machine
Best Practice 1: Keep the first load small
A first load is an opportunity to learn how the machine behaves. You can identify:
- Water requirements
- Cycle duration
- Drain speed
- Vibration
- Spin performance
- Hose behaviour
without risking a large amount of laundry.
Best Practice 2: Check the drain before every use
This takes seconds. Look at:
- Hose position
- Hose bends
- Drain opening
- Sink position
- Possible blockage
A quick inspection can prevent a much larger problem.
Best Practice 3: Use the right detergent quantity
Avoid guessing. Use the detergent label and washer instructions.
Best Practice 4: Don’t mix incompatible fabrics
Sorting helps prevent problems with:
- Colour transfer
- Fabric damage
- Uneven loads
- Different washing requirements
Best Practice 5: Monitor the first cycle after installation
Especially with a new machine. Check for leaks and unusual vibration.
Best Practice 6: Keep the machine level
If your machine has adjustable feet, use the manufacturer’s leveling procedure.
Best Practice 7: Don’t ignore unusual vibration
A small amount of movement can occur during spinning. Severe or sudden vibration deserves investigation.
Dos and Don’ts
| Do | Don’t |
|---|---|
| Read the model-specific manual | Assume every portable washer works the same |
| Check the drain hose | Leave the hose unsecured |
| Sort laundry | Mix every type of garment together |
| Follow the load limit | Stuff the tub full |
| Measure detergent appropriately | Add extra detergent unnecessarily |
| Keep electricity away from water | Use unsafe extension arrangements |
| Check for leaks | Ignore dripping connections |
| Redistribute an unbalanced load | Allow severe vibration to continue |
| Dry the machine after use | Immediately close a wet interior without following care instructions |
| Check garment labels | Machine-wash every fabric automatically |
Benefits of Using a Portable Washing Machine
A portable washing machine can be a practical solution when a conventional washing machine is difficult to install or simply takes up more space than you have available.
- But its advantages depend heavily on how and where you plan to use it.
- It works well in space-constrained homes
- It can be useful when permanent plumbing is inconvenient
- It can be practical for small laundry loads
- Some models offer useful washing flexibility
- Portable machines can be useful for renters
- They can make a useful secondary washer
Drawbacks of Portable Washing Machines
The same features that make portable washers attractive can also create limitations.
Understanding those limitations before buying is more useful than focusing only on the compact size.
- Capacity is often limited
- Twin-tub machines require more work
- Drainage can be inconvenient
- They may require more setup each time
- Drying remains a separate problem
- Performance varies considerably between models
How Does a Portable Washing Machine Work?
At a basic level, a portable washer performs the same fundamental laundry sequence as a conventional washing machine:
Fill → Wash → Drain → Rinse → Extract
The difference is how much of that process the machine handles automatically.
1. Water enters the washer
Water enters the washing tub through an inlet connection. Depending on the model, this might involve:
- A faucet adapter
- A dedicated inlet hose
- A temporary sink connection
- Manual filling
- A built-in or model-specific water connection
Do not assume that an inlet hose from one brand will work with another machine. The connection type and required adapter can vary. Some portable washers are specifically designed for faucet connections, while other compact machines may require manual filling.
Why this matters
A portable washer can be physically small enough to fit beside a sink but still be difficult to operate if the faucet connection is incompatible. Before buying or installing one, check:
- Faucet type
- Adapter compatibility
- Hose length
- Drain location
- Electrical outlet location
2. The washer agitates or tumbles the clothes
Once water and detergent are present, the machine moves the clothes through the water. The exact mechanism depends on the design. A machine may use:
- An agitator
- Pulsator movement
- A rotating drum
- Another manufacturer-specific washing mechanism
The objective is similar: create movement between the clothes, water and detergent so that dirt and soils are released from the fabric. This is why overloading a portable washer can reduce washing effectiveness. If clothes are packed tightly into the tub, there is less room for effective movement.
Common Mistake: Treating the machine’s physical tub size as its recommended laundry load. Always use the manufacturer’s stated capacity and account for the type of fabric being washed.
3. Dirty water is removed
After washing, the used water needs to leave the machine. This is where portable washers differ significantly from permanently installed washing machines. A portable machine may use a drain hose that is positioned into:
- A sink
- A bathtub
- A floor drain
- Another manufacturer-approved drainage point
The exact arrangement depends on the model. The drain hose must remain secure while water is being discharged. A loose hose can move under water pressure and cause flooding.
Why drainage deserves special attention
A portable washer can wash clothes perfectly well and still create a problem if the wastewater cannot leave the machine properly. Common drainage problems include:
- Kinked hose
- Blocked hose
- Hose positioned incorrectly
- Hose falling out of the sink
- Drain opening too small
- Machine installed too far from the drain
Expert Tip: Before starting a wash, physically check the drain hose. Don’t assume that because it was positioned correctly yesterday, it is still secure today.
4. Clean water is used for rinsing
Washing and rinsing are different jobs. During washing, detergent and water help remove soil from the clothes. During rinsing, the goal is to remove remaining detergent and loosened residue.
Depending on the machine, rinsing may happen automatically as part of a programmed cycle or may require the user to drain the first batch of water and introduce clean water again. This is one of the most important differences between automatic and semi-automatic portable washers.
5. Water is extracted during spinning
The final major stage is water extraction. A spin tub or spin cycle rotates the clothes rapidly to remove a significant amount of water before drying. This does not mean the clothes come out dry. They will normally still require air drying or another drying method.
On twin-tub machines, the spin compartment is separate from the wash compartment. That means the user generally has to transfer the clothes manually.
Portable Washing Machine Operating Cycle
| Stage | What Happens | User’s Job |
|---|---|---|
| Fill | Water enters the washer | Connect or supply water correctly |
| Wash | Clothes move through detergent solution | Select cycle/time and avoid overloading |
| Drain | Used water leaves the tub | Make sure drain hose is secure |
| Rinse | Clean water removes detergent residue | Run the appropriate rinse process |
| Spin | Water is extracted mechanically | Balance clothes and use the correct spin setting |
| Dry | Clothes are air-dried or otherwise dried | Remove clothes promptly and dry appropriately |
Practical takeaway
The portable washer is not simply a container that agitates clothes. It is a complete washing system in which water supply, mechanical movement, drainage, rinsing and extraction all have to work correctly.
Types of Portable Washing Machines
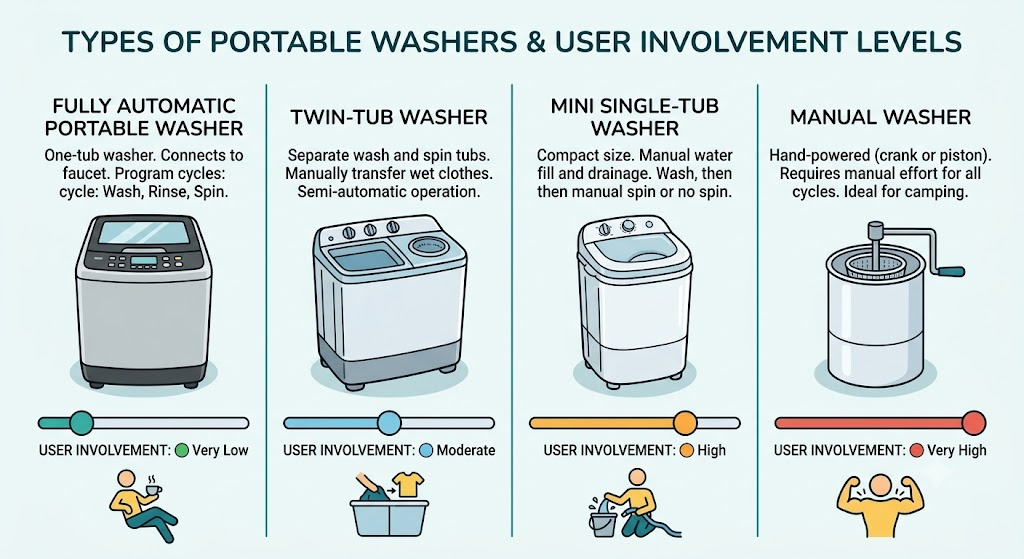
There are several designs marketed as portable or compact washers. For a beginner, the most useful distinction is between automatic portable washers, twin-tub washers and small manual washers.
Type 1: Fully Automatic Portable Washing Machine
A fully automatic portable washer generally combines washing and spinning in one machine and uses programmed controls to manage the cycle.
The user normally:
- Loads clothes.
- Adds detergent.
- Supplies water according to the machine design.
- Selects a program.
- Starts the machine.
- Removes clothes when the cycle finishes.
The machine manages much more of the process.
Best suited for
- People who want convenience
- Regular household laundry
- Users who don’t want to manually transfer clothes
- Apartment residents who have a suitable water and drainage arrangement
Main advantage
Less manual intervention.
Main limitation
The machine can be more dependent on proper water, drainage and electrical arrangements than a very basic manual washer.
Type 2: Twin-Tub Portable Washing Machine
A twin-tub washer has two separate compartments. One is used for washing. The other is used for spinning. This design is common among compact portable and semi-automatic machines.
Typical workflow
Wash tub → Drain → Rinse → Transfer clothes → Spin tub
The user controls more of the process.
Advantages
- Washing and spinning can be managed separately
- You can control the duration of individual stages
- Often practical for small laundry areas
- Can provide useful washing capacity without requiring a full-size machine
Drawbacks
- Clothes must generally be transferred manually
- More user involvement
- Rinsing may require additional water management
- Drainage needs to be monitored carefully
Who should consider one?
A twin-tub model can make sense if you value control and don’t mind spending more time managing the washing process.
Type 3: Compact Single-Tub or Mini Washer
Some very small machines are designed for limited loads. They may be marketed for:
- Socks
- Underwear
- Baby clothes
- Small garments
- Delicates
- Travel or occasional laundry
The operating process can vary significantly. Some require manual filling and draining. Others provide more automated controls.
Important limitation
A machine marketed as a “mini washing machine” does not necessarily have the same functionality as a full portable automatic washer. Check the specifications rather than relying on the product name.
Type 4: Manual Portable Washer
Manual washers use physical human effort rather than a conventional powered washing system. They may use a crank, pressure mechanism or another manual washing method. These are a separate category from electrically powered portable washing machines.
Best suited for
- Very small loads
- Situations without convenient electrical access
- Camping or emergency use
- People who accept additional physical effort
Main drawback
They require considerably more manual work and generally aren’t a direct replacement for a conventional washing machine for regular family laundry.
Portable Washer Type Comparison
| Type | Washing | Rinsing | Spinning | User Involvement | Best For |
|---|---|---|---|---|---|
| Fully Automatic Portable | Automatic | Usually automatic | Automatic | Low | Regular home laundry |
| Twin-Tub | Automatic/manual controls vary | More manual | Separate spin tub | Medium–High | Budget-conscious compact laundry |
| Mini Single-Tub | Varies | Varies | May vary | Medium | Small loads |
| Manual Washer | Manual | Manual | Usually manual/no dedicated spin | High | Occasional or off-grid use |
Automatic vs Twin-Tub: Which Is Easier to Use?
| Factor | Automatic Portable | Twin-Tub Portable |
|---|---|---|
| Loading clothes | Easy | Easy |
| Washing | Mostly automatic | User-controlled |
| Draining | Usually simpler | Often manual |
| Rinsing | Usually easier | More hands-on |
| Spinning | Automatic | Requires transfer |
| User involvement | Lower | Higher |
| Control over individual stages | Lower | Higher |
| Convenience | Higher | Lower |
| Manual work | Less | More |
Neither design is automatically better. The better choice depends on what you value. If you want convenience, an automatic machine is usually the easier option. If you want more control over individual stages and don’t mind manual work, a twin-tub machine can be practical.
Common Mistakes When Using a Portable Washing Machine
- Overloading the washer
- Using too much detergent
- Ignoring the drain hose
- Assuming every faucet is compatible
- Ignoring the electrical requirements
- Washing unsuitable items
- Moving the machine while it contains water
- Closing the machine immediately after washing
- Treating a twin-tub washer like an automatic machine
- Buying based only on capacity
Expert Tips for Better Results
- Start with smaller loads
- Separate heavily soiled clothes
- Pre-treat stubborn stains
- Keep the drain route simple
- Don’t rush the spin stage
- Keep the washer where you can inspect it
- Keep the manual
- Learn your machine’s normal sounds
- Treat water and electricity as separate systems
- Think about the complete laundry workflow
Safety Tips
- Keep water away from electrical connections
- Never use damaged electrical cords
- Don’t overload the machine
- Don’t move the washer while operating
- Don’t allow children to operate the appliance unsupervised
- Never improvise plumbing connections
- Don’t ignore leaks
- Be careful with hot water
FAQs: How to Use a Portable Washing Machine
1. How do you use a portable washing machine for the first time?
Start by reading the manufacturer’s manual and checking the machine’s water, drainage and electrical requirements. Place it on a stable surface, connect the water supply, secure the drain hose, load a small batch of suitable clothes, add the recommended amount of detergent and select the appropriate cycle.
For the first use, monitor the machine for leaks, unusual vibration and drainage problems before running larger loads.
2. How do you use a portable washer without a hookup?
It depends on the specific machine.
Some portable washers are designed for manual water filling, while others require a faucet connection. A machine marketed as portable does not automatically mean that it can operate without a water supply or drainage arrangement.
Check the manufacturer’s instructions before purchasing or attempting a hookup-free setup.
3. Can you use a portable washing machine in an apartment?
Yes, a portable washing machine can be suitable for an apartment if the machine’s installation requirements can be safely met.
Check:
- Available floor space
- Water supply
- Drainage
- Electrical requirements
- Noise and vibration
- Building or rental restrictions
For a rented apartment, avoid making plumbing modifications without permission.
4. Can you use a portable washing machine with a kitchen sink?
Some models can be connected to a compatible faucet, but compatibility depends on the washer and faucet design.
Before connecting one, check the manufacturer’s requirements for:
- Faucet type
- Adapter
- Hose connection
- Water pressure
- Drainage
Never assume that every kitchen faucet will work with every portable washer.
5. How much detergent should you use in a portable washing machine?
Use the amount recommended by the detergent manufacturer and your washing machine’s instructions.
The appropriate quantity depends on factors such as detergent concentration, load size and soil level.
Using excessive detergent can make rinsing more difficult and may leave residue on clothes.
6. Can you wash blankets in a portable washing machine?
Only if the machine’s manufacturer permits the blanket’s size, weight and fabric type.
A blanket may physically fit inside a tub but still be too heavy when wet.
Always check the washer’s capacity and the blanket’s care label before washing it.
7. Can you wash bedsheets in a portable washing machine?
Yes, some portable washers can handle bedsheets, but suitability depends on the machine’s capacity and the size and material of the sheets.
Large or heavy sheets can become difficult to balance during spinning.
Avoid overloading the machine just because the sheets fit inside the tub.
8. Why is my portable washing machine shaking?
Excessive vibration is commonly associated with issues such as:
- Unevenly distributed clothes
- Overloading
- An unstable surface
- Incorrect leveling
- A problem with the machine
Stop the spin cycle safely, redistribute the load and check that the machine is stable.
If severe vibration continues with an appropriate load, consult the manufacturer’s instructions or service support.
9. Why is my portable washing machine not draining?
First check the drain hose for:
- Kinks
- Blockages
- Incorrect positioning
- A blocked drain
Also check whether your machine requires a drain selector or pump to be activated.
If the external drainage path is clear but the machine still will not drain, consult the manufacturer’s troubleshooting instructions.
10. Why are my clothes still wet after spinning?
Possible causes include:
- Overloading
- Uneven load distribution
- Insufficient spin time
- Incorrect spin operation
- A problem with the spin system
For twin-tub machines, distribute clothes evenly in the spin tub before starting the spin cycle.
11. Can you put a portable washing machine in a bathroom?
It may be possible, provided the location meets the manufacturer’s requirements for installation, electrical safety, water supply, drainage and ventilation.
The key issue is not whether the room is a bathroom.
The key issue is whether the appliance can be operated there safely.
Keep electrical connections protected from water and follow the manufacturer’s installation instructions.
12. Do portable washing machines need a drain?
Yes, the used water needs to be discharged somewhere.
Depending on the model, wastewater may drain into a sink, bathtub, floor drain or another approved drainage point.
A portable washer is not a solution for eliminating wastewater; it only provides flexibility in how the machine is connected.
13. Do portable washing machines use less water?
You should not assume that every portable washer uses less water than every conventional washing machine.
Water consumption varies by:
- Machine design
- Load size
- Cycle
- Water level
- Number of rinse cycles
- User behaviour
Compare the manufacturer’s water-use information where available rather than relying on the word “portable.”
14. Are portable washing machines safe?
They can be safe when installed and operated according to the manufacturer’s instructions.
The main risks to control are:
- Water leakage
- Electrical hazards
- Excessive vibration
- Improper drainage
- Overloading
- Incorrect installation
Water and electrical connections deserve particular attention.
If the appliance develops a damaged cord, burning smell, smoke, electrical arcing or severe malfunction, stop using it and seek appropriate service.
15. How long should a portable washing machine run?
There is no universal runtime.
Cycle duration depends on the machine, selected program, load and wash settings.
Some portable machines have relatively simple timed wash controls, while automatic models may determine cycle duration electronically.
Use the manufacturer’s specified cycle times rather than applying a fixed number to every portable washer.
16. Can you leave a portable washing machine unattended?
It’s better to monitor a newly installed or unfamiliar machine, particularly during its first cycle.
Once you understand the machine and its normal operation, follow the manufacturer’s instructions regarding unattended operation.
Never leave an appliance running if you have identified a leak, severe vibration, electrical problem or other abnormal condition.
17. Can you wash delicate clothes in a portable washing machine?
Only if both the garment care label and the machine’s available cycle/settings permit it.
Use the appropriate gentle setting where provided.
Do not assume that a compact washer is automatically gentler than a conventional washing machine.
18. How often should a portable washing machine be cleaned?
Follow the manufacturer’s recommended cleaning schedule.
At a minimum, regularly inspect and clean accessible areas such as:
- Tub
- Lint filter
- Detergent area
- Drain components
The appropriate cleaning frequency depends on how often the machine is used and the model’s design.
Final Thoughts
A portable washing machine can be a practical answer for Indian households dealing with limited space, rental restrictions or relatively small laundry loads. But its convenience depends on the entire setup.
A machine that fits perfectly into a small apartment may still become frustrating if its faucet connection doesn’t match your plumbing or if there is no convenient place to drain wastewater.
Likewise, a compact washer may be useful for everyday clothes but unsuitable for a household that regularly washes large blankets, heavy towels and substantial family loads. The best approach is therefore to evaluate the machine and your laundry environment together.
Recommended Reading:
- How to Fix Portable Washing Machine Vibration
- How to Use a Mini Foldable Washing Machine
- How to Clean Portable Washing Machine Mold Smell
- How to Connect a Sink Adapter for Portable Washer

Sourabh researches and writes about home appliances, kitchen gadgets, and common appliance problems to help readers make smarter buying decisions. He specializes in Portable washing machines and appliance troubleshooting guides.
At compactHomeHub, Sourabh focuses on creating easy-to-understand content that simplifies technical appliance issues into practical solutions. His goal is to help users save time, avoid costly mistakes, and choose the right appliances with confidence.
4 thoughts on “How to Use a Portable Washing Machine: 15 Steps + Mistakes to Avoid”
Comments are closed.