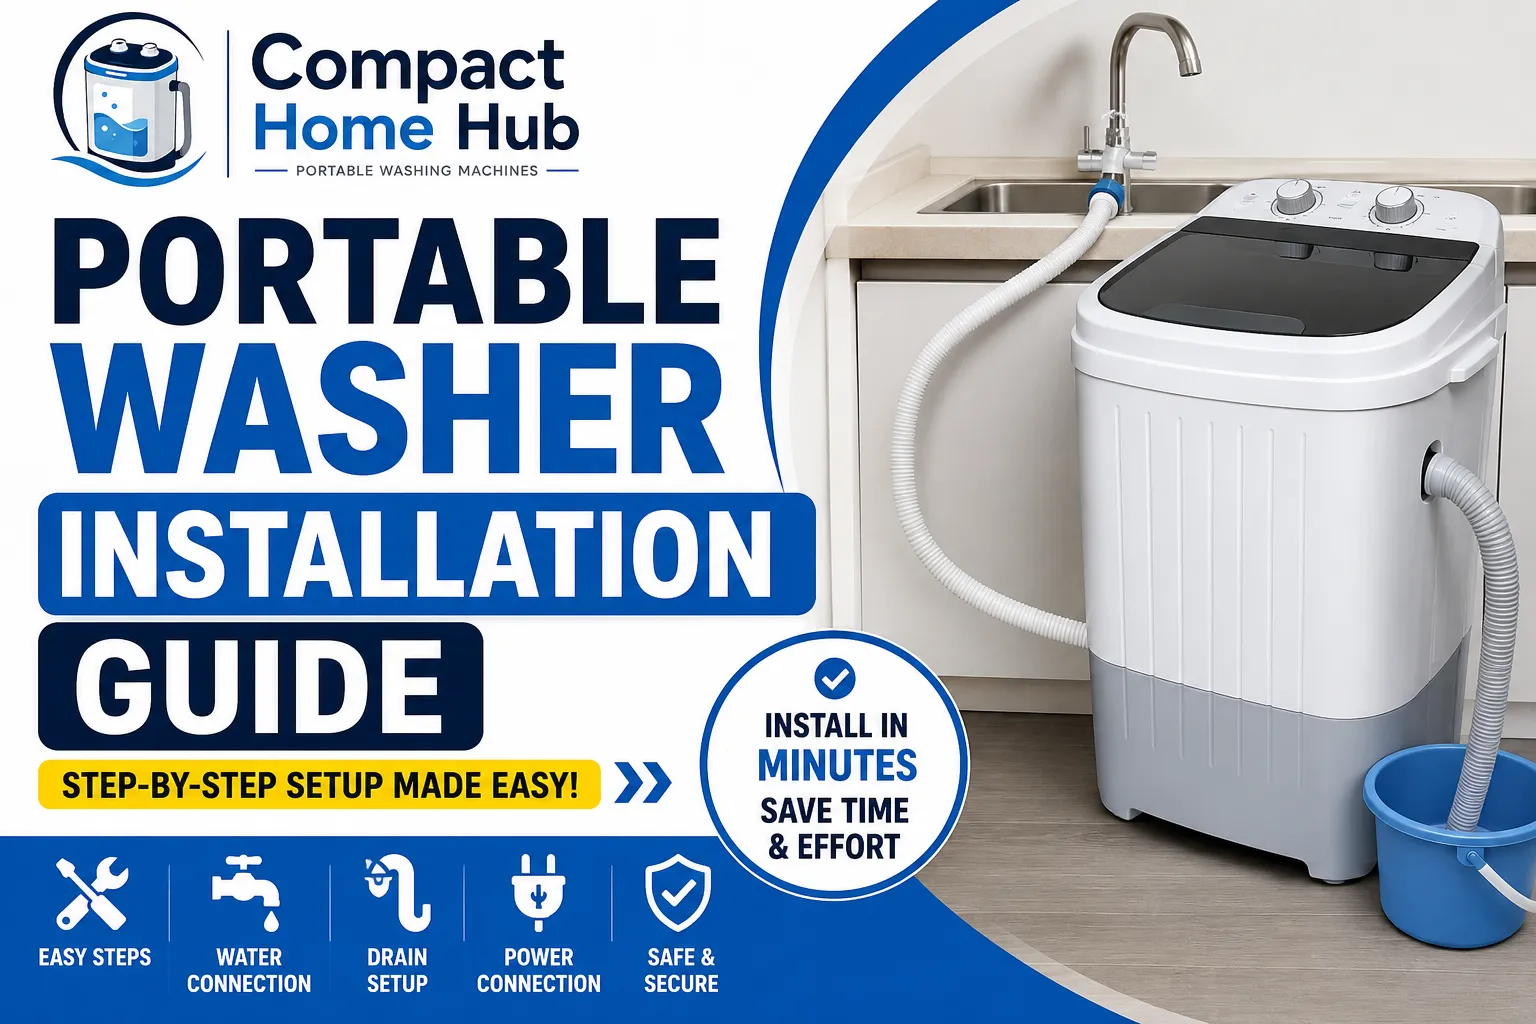
Buying a portable washing machine is the easy part, but installing it correctly is where many people run into problems. A small mistake with the water supply or drain hose can lead to leaks, poor washing performance, or even damage to your home.
In this Portable Washer Installation guide, you’ll learn exactly how to install a portable washer safely, what accessories you’ll need, how to test your setup, and how to avoid the most common installation mistakes.
Key Takeaways
- Portable washer installation involves connecting a portable washing machine to a temporary water supply, drainage point, and electrical outlet without permanent plumbing modifications.
- Proper installation prevents leaks, drainage issues, excessive vibration, and premature machine wear.
- Most portable washing machines connect to standard kitchen or bathroom faucets using a quick-connect faucet adapter.
- A level surface and correctly positioned drain hose are essential for safe and efficient operation.
- Running a test cycle immediately after installation helps identify leaks and loose connections before regular use.
- Routine inspection of hoses and connectors extends the lifespan of your portable washing machine.
- Following the manufacturer’s installation instructions helps maintain warranty coverage and improves washing performance.
What Is Portable Washer Installation?
Portable washer installation is the process of connecting a portable washing machine to a temporary water supply, drainage point, and electrical outlet without permanent plumbing modifications.
For example, someone living in a rented apartment without laundry hookups can install a portable washer in less than 15 minutes and disconnect it after every wash cycle. This convenience makes portable washers popular among apartment renters, college students, RV travelers, and tiny home owners.
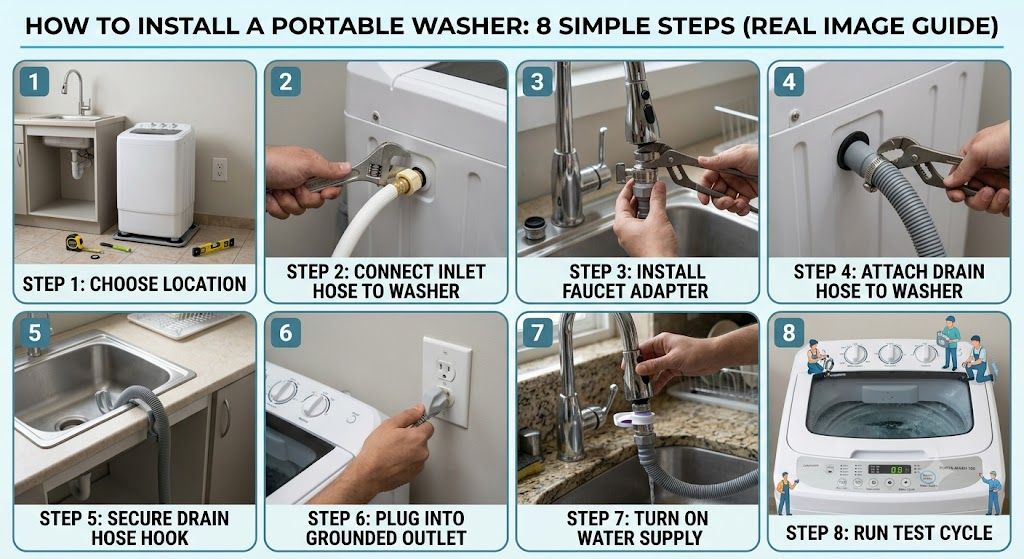
How to install portable washer?
Step 1: Choose the Right Location
- Place the washer on a flat, level, and sturdy floor.
- Keep it close to a compatible faucet, drain, and grounded electrical outlet.
- Leave a few inches of space around the machine for ventilation.
Step 2: Connect the Water Inlet Hose
- Attach the inlet hose to the washer’s water inlet.
- Tighten the connection by hand to avoid damaging the threads.
- Ensure the rubber washer is properly seated to prevent leaks.
Step 3: Install the Faucet Adapter
- Remove the faucet aerator if necessary.
- Screw the supplied faucet adapter onto the faucet.
- Connect the quick-connect fitting from the inlet hose to the adapter.
- Turn on the faucet briefly to check for leaks.
Step 4: Attach the Drain Hose
- Connect the drain hose to the washer’s drain outlet.
- Place the other end securely in a kitchen sink, bathroom sink, utility sink, or laundry tub.
- Make sure the hose is not kinked or twisted.
Step 5: Secure the Drain Hose
- Use the hose hook or clamp provided with the washer.
- Ensure the drain hose stays firmly in place during operation.
- Keep the hose at the height recommended by the manufacturer to prevent backflow.
Step 6: Plug into a Grounded Power Outlet
- Plug the washer directly into a grounded wall outlet.
- Do not use extension cords or power strips.
- Keep the power cord away from water and moisture.
Step 7: Turn On the Water Supply
- Slowly open the faucet to allow water into the washer.
- Inspect the faucet adapter, inlet hose, and rear connections for leaks.
- Tighten any loose connections before proceeding.
Step 8: Run a Test Cycle
- Run the washer empty on a short wash cycle.
- Check for water leaks, unusual noises, excessive vibration, and proper drainage.
- If everything works correctly, your portable washer is ready for regular use.
Temporary Installation vs Permanent Installation
Portable washing machines support two different installation methods.
| Feature | Temporary Installation | Permanent Installation |
|---|---|---|
| Plumbing changes | None | May require modifications |
| Best for | Apartments, dorms, RVs | Homes with dedicated laundry area |
| Faucet connection | Quick-connect adapter | Dedicated water supply |
| Drainage | Sink or bathtub | Standpipe |
| Mobility | High | Low |
| Installation time | 10–20 minutes | 1–2 hours |
For most users, temporary installation is the safest and easiest option because it requires no plumbing experience and doesn’t violate apartment rental agreements.
How Do You Install a Portable Washer Step by Step?
Proper portable washer installation involves positioning the machine on a level surface, securely connecting the inlet hose, attaching the drain hose, and testing for leaks before the first wash.
Following these steps helps ensure safe operation and reduces the risk of leaks, vibration, and drainage problems.
Step 1: Position the Portable Washer
Place the washer:
- On a flat surface
- Close to a water source
- Near a drain
- Within reach of a grounded outlet
Leave at least 2–4 inches (5–10 cm) of clearance around the machine for ventilation and hose movement.
Use a spirit level to confirm that all four feet touch the floor evenly. A level washer spins more quietly and experiences less wear on internal components.
Step 2: Connect the Water Inlet Hose
Locate the inlet connection on the back of the machine.
Then:
- Attach the hose firmly.
- Hand-tighten the connection.
- Avoid over-tightening.
- Check the rubber gasket.
- Ensure there are no twists in the hose.
Even a slightly damaged washer gasket can cause leaks under water pressure.
Step 3: Install the Faucet Adapter
Remove the faucet aerator.
Next:
- Install the supplied adapter.
- Tighten by hand.
- Connect the quick-release fitting.
- Pull gently to verify it has locked into place.
Turn on the faucet slowly. Inspect every connection for water leaks before proceeding.
Step 4: Connect the Drain Hose
Attach the drain hose securely to the rear outlet.
Then place the other end into:
- Kitchen sink
- Bathroom sink
- Laundry tub
- Utility sink
- RV drain
Never place the drain hose directly on the floor. Improper drainage can cause wastewater to flow back into the washer.
Step 5: Secure the Drain Hose
Correct drain hose positioning prevents backflow and accidental flooding.
Many portable washers include a drain hose hook. Use it to secure the hose firmly over the sink edge.
If no hook is included, use:
- Hose clamp
- Zip tie
- Sink bracket
The hose should remain stable throughout the wash and spin cycles.
Step 6: Plug into a Grounded Outlet
Before turning on the machine:
- Verify the outlet is dry.
- Keep the cord away from water.
- Do not coil excess cable tightly.
- Avoid extension cords.
Electrical safety should always take priority over convenience.
Step 7: Turn On the Water Supply
Open the faucet gradually. Inspect:
- Adapter
- Hose connection
- Rear inlet
- Faucet threads
If you notice even a small drip, turn off the water immediately and tighten the connection.
Step 8: Run the First Test Cycle
A test cycle confirms that the installation is successful. Run the washer without clothes. During the cycle, check for:
- Water leaks
- Drainage problems
- Excessive vibration
- Strange noises
- Error codes
Once the cycle finishes successfully, your washer is ready for normal use.
Who Should Use a Portable Washing Machine?
A portable washer is an excellent solution for people who need convenient laundry without a traditional laundry room. It works particularly well for:
- Apartment renters
- College students
- RV owners
- Tiny home residents
- Vacation cabins
- Studio apartments
- Mobile homes
- People who wash small loads frequently
For example, if you live on the third floor of an apartment building without shared laundry facilities, a portable washer eliminates repeated trips to a laundromat while using very little floor space.
Once you’ve decided which model fits your needs, proper installation is the next step. Our guide to the best portable washing machines can help you compare capacity, portability, faucet compatibility, and other important features.
How Does a Portable Washing Machine Connect?
Most portable washing machines are designed to connect to a standard kitchen or bathroom faucet using a quick-connect faucet adapter.
The installation process is surprisingly simple:
- Connect the inlet hose to the faucet.
- Attach the drain hose to the sink or drain.
- Plug the washer into a grounded outlet.
- Turn on the water supply.
- Run a test cycle.
Unlike full-size washing machines, portable models don’t require permanent hot and cold water lines. Most portable washing machines are designed to connect to standard kitchen or bathroom faucets using a quick-connect faucet adapter.
What Parts Are Included With Most Portable Washers?
Most manufacturers include everything required for a basic installation.
Typically, you’ll receive:
- Water inlet hose
- Drain hose
- Faucet adapter
- Hose connector
- User manual
- Quick-connect fitting
Some premium brands also include:
- Extra faucet adapters
- Hose clamps
- Water pressure regulator
- Replacement washers
If your faucet isn’t compatible, you may need to purchase a separate adapter.
Can You Install a Portable Washer Without Plumbing?
Yes. Most portable washing machines are specifically designed to work without permanent plumbing hookups.
Instead of dedicated laundry connections, the washer temporarily uses:
- Kitchen sink
- Bathroom sink
- Utility sink
- Laundry tub
After the wash cycle finishes, you simply disconnect the hoses and store the machine. This flexibility is why portable washers are ideal for renters who cannot modify plumbing or install permanent appliances.
Why Is Proper Portable Washer Installation Important?
Proper portable washer installation prevents leaks, improves washing performance, protects your home’s plumbing, and extends the life of your appliance.
According to the Insurance Information Institute, water damage accounts for nearly 24% of homeowners insurance claims related to property damage. — Source: Insurance Information Institute, 2024
While portable washers use less water than full-size machines, even a small leak can damage flooring, cabinets, or nearby furniture if left unchecked.
- Proper Installation Prevents Water Leaks: Secure hose connections are the first defense against water leaks.
- Proper Installation Improves Washing Performance: A correctly installed washer cleans clothes more effectively because water enters and drains at the correct pressure.
- Proper Installation Protects Your Plumbing: Portable washers are designed for temporary use, but improper installation can still stress household plumbing.
- Proper Installation Extends Machine Life: A properly installed portable washer experiences less vibration, less motor strain, and fewer maintenance problems.
Installation Benefits at a Glance
| Benefit | Why It Matters |
|---|---|
| Leak prevention | Protects floors and cabinets |
| Stable operation | Reduces vibration and noise |
| Better cleaning | Maintains proper water flow |
| Faster drainage | Prevents standing water |
| Longer lifespan | Reduces wear on internal components |
| Warranty protection | Meets manufacturer installation guidelines |
| Improved safety | Reduces electrical and plumbing hazards |
What Do You Need Before Installing a Portable Washing Machine?
Preparing the right tools and checking compatibility before installation makes the process faster, safer, and helps prevent leaks. Spending a few minutes inspecting your faucet, water pressure, electrical outlet, and installation area can save hours of troubleshooting later.
According to the U.S. Consumer Product Safety Commission (CPSC), many household appliance accidents occur because of improper electrical connections or incorrect installation practices. Always follow the manufacturer’s installation instructions and use a grounded outlet. — Source: CPSC, 2024
Essential Tools and Accessories
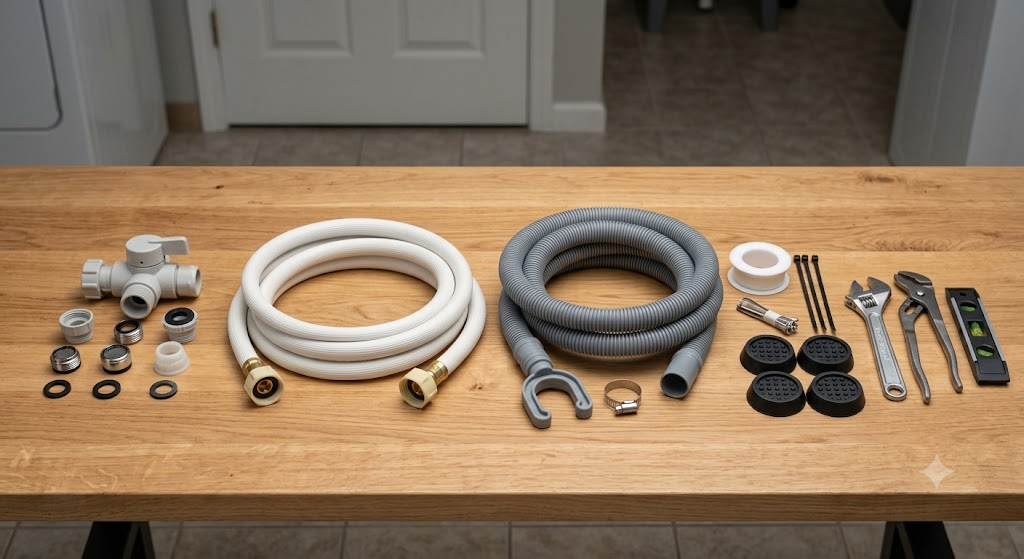
Most portable washers include basic installation accessories, but you may need a few additional items depending on your home’s plumbing.
| Item | Required | Purpose |
|---|---|---|
| Faucet adapter | ✅ Yes | Connects the washer to your faucet |
| Water inlet hose | ✅ Yes | Supplies clean water |
| Drain hose | ✅ Yes | Removes wastewater |
| Hose clamps | Recommended | Prevents hose movement |
| Adjustable wrench | Optional | Tightens adapters if necessary |
| Spirit level | Recommended | Ensures the washer sits level |
| Towels or bucket | Recommended | Catches any spilled water |
| Water pressure regulator | Optional | Protects the washer in high-pressure systems |
Choose the Right Installation Location
A portable washer should always be installed on a flat, solid, and waterproof surface near a faucet, drain, and electrical outlet.
Avoid placing the washer on:
- Thick carpets
- Uneven flooring
- Wooden platforms
- Outdoor surfaces
- Areas exposed to rain
- Near heaters or direct sunlight
A stable surface reduces vibration and improves spinning performance. For example, a tiled kitchen floor is usually a much better installation location than a carpeted bedroom.
Check the Electrical Requirements
Portable washing machines should always be plugged directly into a grounded 120V outlet.
Never:
- Use an extension cord
- Use a multi-plug adapter
- Connect through a power strip
- Plug into a damaged outlet
These practices increase the risk of overheating and voltage drops. Portable washing machines should always be connected directly to a grounded electrical outlet to ensure safe operation.
What Type of Faucet Works with a Portable Washing Machine?
Most portable washing machines work with standard threaded kitchen or bathroom faucets using a quick-connect adapter.
Before buying a washer—or attempting installation verify that your faucet is compatible.
Compatible Faucet Types
Most manufacturers support:
- Standard threaded faucets
- Kitchen sink faucets
- Utility sink faucets
- Bathroom faucets with removable aerators
These faucets allow the supplied quick-connect adapter to attach securely.
Faucets That May Not Be Compatible
Some faucet designs require special adapters or may not work at all.
Examples include:
- Pull-down faucets
- Pull-out spray faucets
- Touchless faucets
- Waterfall faucets
- Designer faucets without threaded aerators
If your faucet falls into one of these categories, check whether the washer manufacturer offers an optional adapter kit.
How to Check Faucet Compatibility
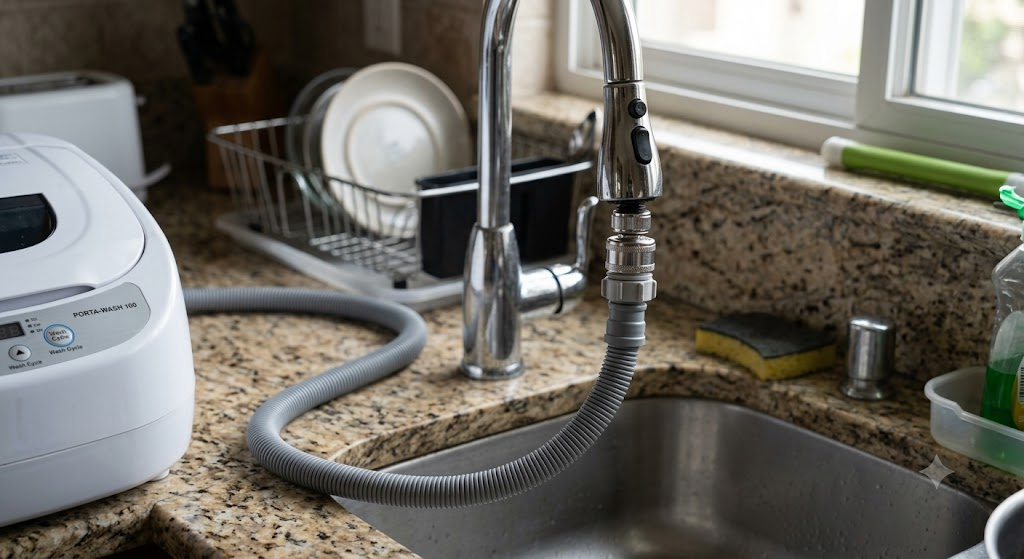
Before installing the washer:
- Remove the faucet aerator.
- Inspect the threads.
- Compare the thread size with your adapter.
- Install the correct rubber washer.
- Hand-tighten the adapter.
- Turn on the faucet briefly to check for leaks.
How Should You Position the Drain Hose Correctly?
Correct drain hose placement ensures wastewater leaves the washer efficiently without flowing back into the machine.
Improper positioning is one of the most common installation mistakes. General recommendations include:
- Keep the hose above the minimum height specified by the manufacturer.
- Avoid sharp bends.
- Prevent kinks.
- Secure the hose firmly.
- Do not immerse the hose underwater.
A properly positioned drain hose improves draining speed and protects the pump.
Common Drain Hose Mistakes
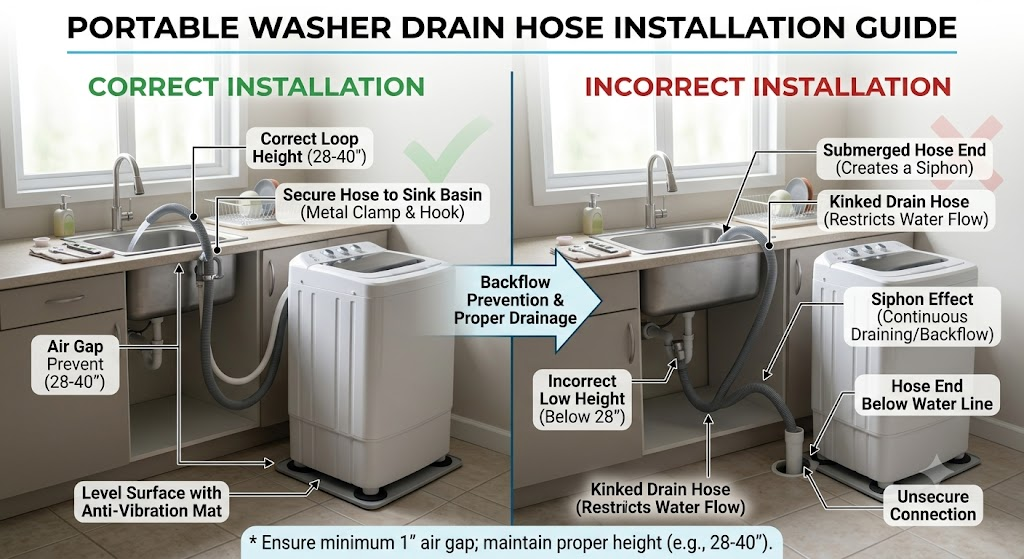
- Avoid these errors:
- Placing the hose on the floor
- Using an excessively long extension hose
- Allowing the hose to slip out of the sink
- Bending the hose sharply
- Blocking the hose opening
Each of these issues can lead to drainage failure or water leaks.
Can You Install a Portable Washer Without Plumbing Hooks?
Yes. Most portable washing machines are specifically designed for homes without permanent plumbing connections.
Instead of dedicated hookups, they use temporary faucet adapters that attach only during washing. This makes portable washers ideal for small spaces:
- Apartments
- Dormitories
- Tiny homes
- RVs
- Vacation rentals
After each wash cycle, disconnect the hoses and store the washer if needed.
Portable Washer Installation Checklist
Before washing your first load, verify every item below.
| Checklist Item | Complete |
|---|---|
| Washer sits level | ☐ |
| Faucet adapter installed securely | ☐ |
| Water inlet hose connected | ☐ |
| Drain hose secured | ☐ |
| Grounded outlet used | ☐ |
| Water pressure checked | ☐ |
| No visible leaks | ☐ |
| Test cycle completed | ☐ |
Completing this checklist significantly reduces installation problems and helps ensure safe, reliable operation from day one.
What Are the Most Common Portable Washer Installation Mistakes?
Most portable washer installation problems are caused by incorrect hose connections, poor leveling, incompatible faucets, or improper drainage. Fortunately, these issues are easy to avoid with a little preparation and routine inspection.
According to the Insurance Information Institute, water damage and freezing account for nearly 28% of all homeowners insurance claims in the United States. While not all claims involve washing machines, appliance leaks are a common contributor. — Source: Insurance Information Institute, 2024
1. Using the Wrong Faucet Adapter
Many users assume every faucet is compatible. However, pull-down, touchless, and waterfall faucets often require special adapters or may not support portable washers at all.
Solution: Always verify your faucet type before purchasing a portable washer.
2. Not Leveling the Washer
A portable washer must sit on a flat, stable surface. An uneven machine can cause:
- Excessive vibration
- Loud spin cycles
- Walking or movement
- Poor drainage
- Increased wear on bearings
Solution: Adjust the leveling feet until the washer is stable in all directions.
3. Improper Drain Hose Placement
Incorrect drain hose placement is one of the most common causes of water leaks and drainage problems in portable washing machines.
Common mistakes include:
- Letting the hose fall out of the sink
- Placing the hose too low
- Kinking the hose
- Blocking the hose opening
Solution: Secure the hose with the supplied hook or a hose clamp and follow the height recommendations in your owner’s manual.
4. Using an Extension Cord
Portable washers draw a significant amount of power during wash and spin cycles.
Never use:
- Extension cords
- Multi-plug adapters
- Cheap power strips
Instead, plug the machine directly into a properly grounded wall outlet.
5. Skipping the Test Cycle
Many people immediately start washing clothes after installation. This is risky. A test cycle helps identify:
- Loose hose connections
- Leaks
- Drainage issues
- Unusual noises
- Error messages
Running the machine empty first can prevent water damage and unnecessary repairs.
Why Is My Portable Washer Leaking After Installation?
A portable washer usually leaks because of loose hose connections, damaged rubber washers, excessive water pressure, or an incorrectly positioned drain hose.
Start by turning off the water supply immediately and inspect:
| Problem | Possible Cause | Solution |
|---|---|---|
| Leak at faucet | Loose adapter | Tighten connection |
| Leak at inlet hose | Damaged washer | Replace rubber washer |
| Water on floor | Drain hose slipped | Secure hose properly |
| Water under machine | Internal hose loose | Inspect rear connections |
| Overflow | Drain blocked | Clear drain and reposition hose |
For example, if water drips only when the faucet is turned on, the issue is usually the faucet adapter rather than the washing machine itself.
Portable Washer Troubleshooting Guide
Portable washer troubleshooting involves identifying the source of the problem before replacing parts or calling for service.
Many issues can be solved in a few minutes.
1. Water Isn’t Entering the Washer
Possible causes include:
- Closed faucet
- Kinked inlet hose
- Blocked inlet filter
- Low water pressure
- Incorrect faucet adapter
2. Washer Doesn’t Drain
Check whether:
- Drain hose is kinked
- Drain hose is too high
- Pump filter is clogged
- Sink drain is blocked
3. Washer Vibrates Excessively
Excessive vibration usually means:
- Washer isn’t level
- Load is unbalanced
- Machine is overloaded
- Floor isn’t stable
4. Error Codes Appear
Different manufacturers use different error codes. Always:
- Note the error code.
- Restart the washer.
- Consult the user manual.
- Contact customer support if necessary.
What Accessories Can Make Installation Easier?
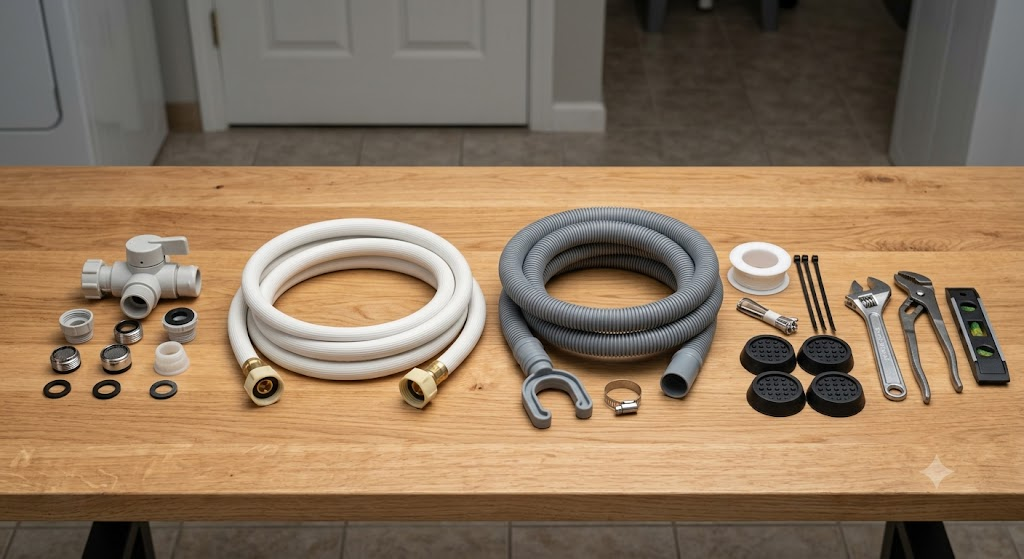
The right accessories improve installation safety, compatibility, and long-term reliability.
Useful accessories include:
- Universal faucet adapters
- Stainless steel inlet hoses
- Drain hose extensions
- Hose clamps
- Water pressure regulators
- Anti-vibration pads
- Replacement rubber washers
- Leak detection sensors
What Should You Do After Installing a Portable Washer?
Proper maintenance after installation keeps your portable washer running efficiently and helps prevent unexpected breakdowns.
1. Run Your First Load Carefully
Wash a small load first. Observe:
- Water flow
- Drainage
- Noise
- Spin performance
- Hose movement
If everything operates normally, you’re ready for regular use.
2. Clean the Lint Filter Regularly
Many portable washers include a removable lint filter. Clean it:
- Weekly for frequent use
- Monthly for occasional use
A clean filter improves water circulation and washing performance.
3. Inspect Hoses Every Few Months
Inspecting hoses and faucet connections before every use helps prevent leaks and extends the lifespan of a portable washing machine.
Look for Cracks, Bulges, Rust or Loose fittings. Replace damaged hoses immediately.
4. Leave the Lid Open
After every wash:
- Drain remaining water.
- Wipe the drum dry.
- Leave the lid slightly open.
This reduces mold, mildew, and unpleasant odors.
5. Use the Right Detergent
Most portable washers work best with high-efficiency (HE) detergent because it produces fewer suds and rinses more effectively. Using too much detergent can leave residue inside the drum and hoses.
FAQs
Q. Can I connect a portable washer to a bathroom sink?
Yes. Most portable washers can connect to a bathroom sink if the faucet has compatible threads for a quick-connect adapter.
Q. Can I leave my portable washer connected all the time?
It depends on the manufacturer. Many brands recommend disconnecting the hoses after each use to reduce wear and minimize the risk of leaks.
Q. How long does it take to install a portable washer?
Most portable washers can be installed in 10 to 20 minutes after the first setup.
Q. Do portable washing machines need special plumbing?
No. Most portable washers are designed to work with temporary faucet connections and standard household drains.
Q. Can I use hot water?
Most models support both cold and hot water if your faucet provides the desired temperature. Always check your owner’s manual first.
Q. Do portable washers damage apartment plumbing?
No. When installed correctly with the proper faucet adapter and drain hose, portable washers should not damage standard household plumbing.
Conclusion
Portable washer installation is straightforward when you follow the correct steps and use the right accessories. By choosing a compatible faucet, leveling the machine, securing the drain hose, and running a test cycle, you can avoid the most common installation problems before they happen.
Remember that installation doesn’t end after the first wash. Regularly inspecting hoses, cleaning filters, and checking connections will keep your portable washer operating safely and efficiently for years.
Whether you live in an apartment, dorm, RV, or tiny home, a properly installed portable washing machine can save time, reduce trips to the laundromat, and make laundry much more convenient.
Recommended Related Guides:
- Best Portable Washing Machine Under $200 (2026)
- 10 Best Portable Washing Machine for Apartments 2026
- How Does Portable Washer and Dryer Work?
- 10 Best Portable Washing Machine for Camping

Sourabh researches and writes about home appliances, kitchen gadgets, and common appliance problems to help readers make smarter buying decisions. He specializes in Portable washing machines and appliance troubleshooting guides.
At compactHomeHub, Sourabh focuses on creating easy-to-understand content that simplifies technical appliance issues into practical solutions. His goal is to help users save time, avoid costly mistakes, and choose the right appliances with confidence.